A little bit ago, Sherry from Young House Love got together with a few of her friends and issued a Pinterest challenge, the idea being to actually use Pinterest to inspire you to make something, and not just to glamour you like a time-sucking vampire with the pretty colors. Oooooo, pretty colors.
Surprisingly, I actually have used Pinterest a few times to inspire real-life projects. How is it that so many projects do not end up on the blog??? My sister and I spent a whole day once doing naughty things to t-shirts (like cutting them up and then not even sewing proper hems on them!) inspired by Pinterest projects. I guess most of those ended up belonging to Melissa, which is why they didn't show up here.
I'm a bit late on this project, but here it is! This is something I've been planning for weeks! And it's finally done! I managed to fit it into my oh-so-busy and important schedule. Did I mention I spent last weekend hiking 16 miles through the Virgin River Narrows in Zion National Park, the same trip that got flash flooded out last year? My first overnight, backpacking trip. Walking in a river for 16 miles with a pack that weighs 24 pounds is stinkin' hard work, people!
 |
| That's me in the foreground and David up ahead. |
We only crossed that river hundreds of times. No big deal.
So, anyway, amid my 16 mile hikes and cleaning and packing to get ready and recovering from the truly awe-inspiring, wrap-around blisters I got on the hike, I did my project, which was inspired by these yarn balls. I adore them. So much string! Who couldn't love a thing with so much string? I think I have some feline/Dr. Seuss DNA in there somewhere.
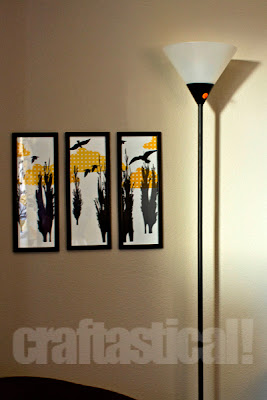
I bought this lamp for $3 at a yard sale a while back,with this project in mind. This is the before shot.
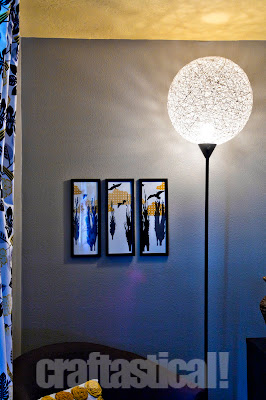
I used a 24" beach ball, wrapping it in string that was dipped in a mixture of Mod Podge, cornstarch and water. I made sure to leave a hole in the top and bottom in order to get the light bulb in and out. The photo I pinned has a good tutorial, although I didn't bother with the petroleum jelly. I couldn't imagine that I could glue string to a beach ball with Mod Podge even if I really, really wanted to. A balloon might be different.
And after letting it dry and removing the beach ball (you should have seen Aubrey's face after she realized I cut a hole in it to get it out!), I had this:
Cost for this project:
Lamp: $3
Beach ball: $1
String: $5
Glue: Freeee!
Total: $9
My string ball is pretty much just sitting up there. I need to figure out a way to make it more secure and I'm thinking of spray painting the black lamp stand--maybe a gunmetal? I love the shadows it casts though.


I love it! I want one for my front room! :D
ReplyDeleteI'm so impressed. I tried these with balloons and could not do it. Craft fail for me. The yarn kept sliding off.
ReplyDeleteI am so grateful you posted this on YHL - I've loved the string lights on Pinterest but have only seen them hanging from the ceiling so thought they wouldn't work in my house. This is perfect, and so stylish!
ReplyDeleteIt looks incredible! I love the way this turned out!
ReplyDeleteThis looks great! I found your post via the YHL pinterest challenge. I'd love to hear what solution you find to securing the string ball to the lamp stand. What a creative idea!
ReplyDeleteMelissa, I have an idea in mind that uses a piece of the old shade, but I have no idea if I'll be able to cut the plastic. We'll see. :) If I figure out a good way, I'll blog about it.
ReplyDeleteVery cool. So inspiring seeing what everyone's worked on.
ReplyDeleteSo creative - I love it! I currently have a couple ideas for making over my similar lamp...just need to decide on one.
ReplyDeleteKristen
Turning a House into a Home
Oh, I keep seeing these and I just love them! This is the first one I've seen not hanging and I really like the looks of it!! I especially like the shadows it casts on the walls and ceiling. It just looks like summer to me!!
ReplyDeleteI'm hosting my *first ever* link party tomorrow - it opens tonight at 5:00 EDT in a couple hours. I'd love for you to come by and link this up! :)
Happy to be your newest follower ~ Adrianne
happyhourprojects.blogspot.com
Awesome! Looks like something I could possibly manage! Possibly.
ReplyDeleteI love that you put your on a lamp instead of just hanging it from the ceiling!
ReplyDeleteI love it, and would like to try it. I was wondering how did you remove the ball from it ? and also how did you fix it on the stand ?
ReplyDeleteSo very cool! That was some grueling hike you did - am just amazed at your endurance, but having been to Zion it gives me chills (in a good way) thinking of the scenery that surrounded your every step.
ReplyDeleteTypefashion, I just stabbed the ball with a knife and deflated it to remove it. It came out pretty easily. My daughter was pretty sad I ruined the beach ball. LOL.
ReplyDeleteI haven't fixed it on the stand yet. The way my light is, the light bulb keeps it from rolling off if it gets knocked, which it has a few times. I'm actually thinking about hot gluing it on. I need to think about it some more and come up with a better solution. If I figure one out, I will post it. If you figure one out, I'd love to hear it! I'm sure there are a lot of effective ways. I've been busy; we just got back from Yellowstone and my kids started school, so my brainpower hasn't been engaged in figuring this out.
Wow!!! My friend has been wanting to make a string pendant lamp, but I'll have to show her this version. Thanks for the inspiration!!!
ReplyDeleteare you worried about the string catching on fire or the glue melting??? what size lightbulb did you use?
ReplyDeleteYes! I'm so impressed how you took the tutorial and applied it to something so functional for you! It completely amazing!!!!
ReplyDeletesooooooo pretty
ReplyDeleteWhat a great project! :) I've featured this post on Craft Gossip here:
ReplyDeletehttp://homeandgarden.craftgossip.com/string-ball-floor-lamp/
If you would like a "featured by" button, you can grab one here:
http://homeandgarden.craftgossip.com/grab-a-craft-gossip-button/
This. Is. AWESOME!!!
ReplyDelete